You have most likely experienced a moment when a package was delivered that felt like it was made for you—when the box fit right, the colors matched the brand, and there was the moment of satisfaction when you opened it. However, once you get the chance to make your own boxes, it can be overwhelming real quick.
What type of material will you select? What size? How does even printing work? Make your own or delegate to another person?This book has all the answers. From initial concept to final delivery, here are the steps to creating a custom box for your brand, whether you’re new to the product or just want to break away from the same old brown boxes that everyone else is using.
What Is a Custom Box, Really?
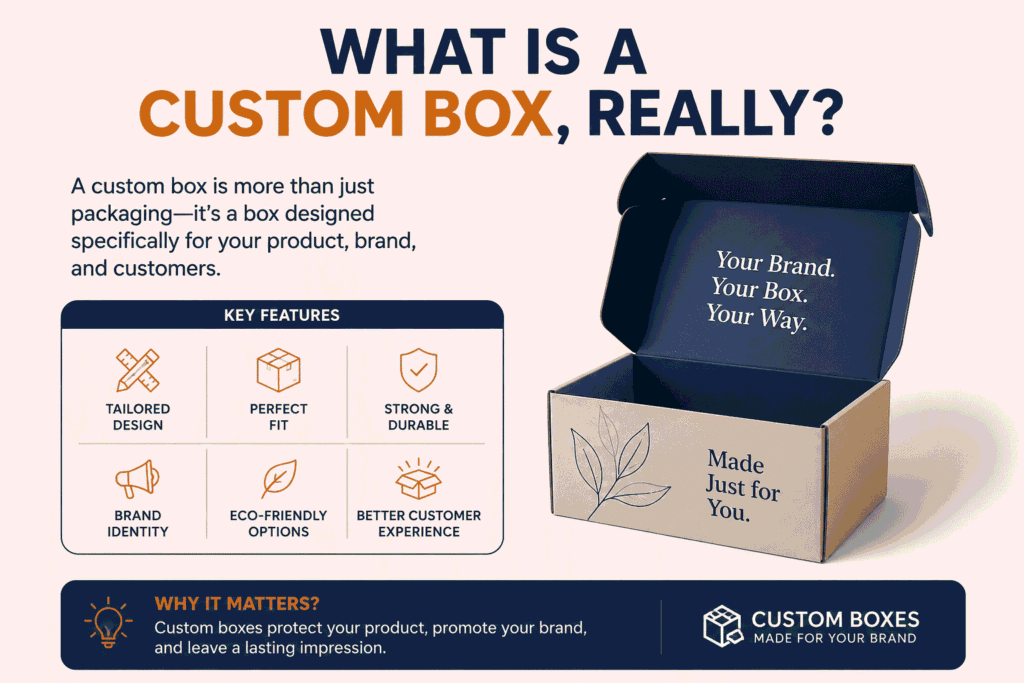
It’s helpful to have a clear idea of the meaning of custom in packaging before getting started.
A custom box is a packaging that is designed to meet your specific needs, the size, the material, the construction, the printing and the lining. As opposed to any stock boxes you will discover on the shelf, a custom box is created around your product and your brand. It fits the product well, has your logo and colors, and conveys information to your customer about you before they open it.
Step 1:What Your Box Needs to Do
Businesses make the largest error when they immediately start designing without determining what the box is actually supposed to do. If you are going to use a design tool or contact a manufacturer, consider these questions:
What do I put in a package? A folded t-shirt will not be as effective as a fragile glass candle. Cosmetics must look the way they’re meant to look. Structural strength is required for heavy tools. Focus on the product, not the styling.
Where is this box going? The packaging for a product on the shelf is decided in 3 seconds by a passerby. Shipping boxes get thrown around by couriers. If there is a box on a boutique counter, it must look immaculate. An understanding of the route your box will travel.
Step 2: Choose the Right Box Style
Especially, there are more box styles than you think, and choosing the right one from the wrong will cause additional cost and trouble. Below are the most prevalent styles and how they are most useful:
Mailer Boxes: The gold standard of subscription boxes, for ecommerce brands. Self-locking, no tape required, open-ups spectacularly (perfect for unboxing videos), and print in and out. This is your style if you are shipping directly to consumers and want to put the finishing touches on the unboxing experience.
Corrugated Shipping Boxes Built for protection over presentation. These have a wavy inner layer (the “flute”) between two flat sheets that absorbs impact during transit. Use these when your product is fragile, heavy, or making a long journey.
Rigid Boxes (Set-Up Boxes) These don’t fold flat — they arrive pre-assembled. They’re expensive to produce but convey serious luxury. Think high-end perfume, jewelry, electronics. If the box itself is part of what makes your product feel premium, this is the style.
Gable Boxes Built-in handles, easy to carry, great for gifts and food. Common at bakeries, kids’ parties, and retail packaging for small goods.
Step 3: Get Your Dimensions Right
One of the most common sizing issues is made by first-time custom box buyers and is one of the most expensive that can be corrected after production.
The principle: size your box around your product, and then measure three times.
The size of boxes is always given in the following order: Length x Width x Depth (or Height).
If the box is tight-fitting (typical of retail packaging), then there should be about 1/8″ to 1/4″ of clearance on each side. If too tight, the product will not fit. Too loose and it moves around when shipping it can cause damage, and it looks messy when opened.
When shipping boxes, you’ll also need to consider interior packaging – foam inserts, tissue paper, crinkle packing or molded pulp boxes. If you want to add an extra inch in foam on either side, factor this into your box dimensions when ordering.
Step 4: Pick Your Packaging Material
The material has an impact on the appearance, texture, weight, strength and cost of the box. Let’s take a look at the principal alternatives:
Cardboard (Paperboard / Cartonboard) Most common material used for retail packaging. Light, smooth, and excellent for printing. Typically, points (pt) will be used to measure it; the usual range in the retail industry is from 14pt to 24pt. The higher the point the thicker and sturdier.
Corrugated Board Made from three layers: two flat liner sheets are between them, and one fluted (wavy) sheet. Available in various sizes of flutes – B, C, E – which have varying thickness and cushioning. Best option for couriers. Not as smooth in terms of printability, but digital print on corrugated is much improved.
Kraft Paper / Kraft Board Brown, natural-looking and eco-friendly paper. It is typically not coated, lending it a raw, natural quality, ideal for sustainable and natural brands. Prints well in limited color ranges with the ability to print in full CMYK colors.
Step 5: Design Your Box
This is where the magic happens — and where people either nail their packaging or waste their budget on something forgettable.
A few things to get right:
Work with a dieline, not just flat artwork. A dieline is the flat, unfolded template of your box — it shows where folds happen, where glue goes, and the boundaries of every panel. Your designer needs to work within this template, or the print won’t line up properly when the box is assembled. Any good packaging supplier will provide a blank dieline for your chosen box style.
Keep important elements away from the fold and glue areas. Text or logos that land on a fold line can get distorted or cut off. Leave at least 1/4″ of safe space around any edge you don’t want interfered with.
Think about the inside too. Interior printing is one of the highest-impact, lowest-cost upgrades you can make to a box. A bold color, a thank-you message, or a repeated pattern on the inside creates a memorable unboxing moment. Customers share these on social media. It costs surprisingly little to add.
Step 6: Choose a Printing Method
How your box gets printed affects both cost and quality. The main options:
Offset Lithographic Printing: The traditional method for high-volume orders. Plates are made for each color, then applied layer by layer. Produces sharp, consistent results and is cost-effective at high quantities (typically 500+ units). Not ideal for small runs because the plate setup cost gets spread across fewer units.
Digital Printing: No plates required — artwork is printed directly from a digital file. Better for smaller orders (50–500 units), faster turnaround, and good for personalized or versioned packaging. Slightly less precise on color matching than offset, but has improved dramatically in recent years.
Flexographic Printing Common for corrugated boxes and large-run uncoated packaging. Uses flexible rubber plates. Good for spot-color jobs and large formats. Not as detailed as offset for photographic or gradient-heavy designs.
Step 7: Select Your Finish
The finish is the coating applied to the outside of the printed box. It’s not just about looks — it also protects the print from scuffing and moisture. Options include:
Gloss Lamination — High-shine, vivid color pop. Makes colors look saturated and rich. Fingerprints show, but it looks sleek and modern.
Matte Lamination — Soft, flat finish. Feels premium and sophisticated. Pairs beautifully with spot UV or foil effects.
Soft-Touch Lamination — Feels like velvet. Adds a tactile luxury element that makes customers want to keep holding the box.
Spot UV — A glossy coating applied only to specific areas (a logo, a pattern) over a matte base. Creates contrast and dimension that catches light.
Foil Stamping — Metallic foil pressed onto the surface. Gold, silver, rose gold, holographic. Adds unmistakable premium signaling.
Embossing / Debossing — Raises or presses a design into the material. No ink required. Used for logos on luxury rigid boxes.
Step 8: Request a Sample Before Mass Production
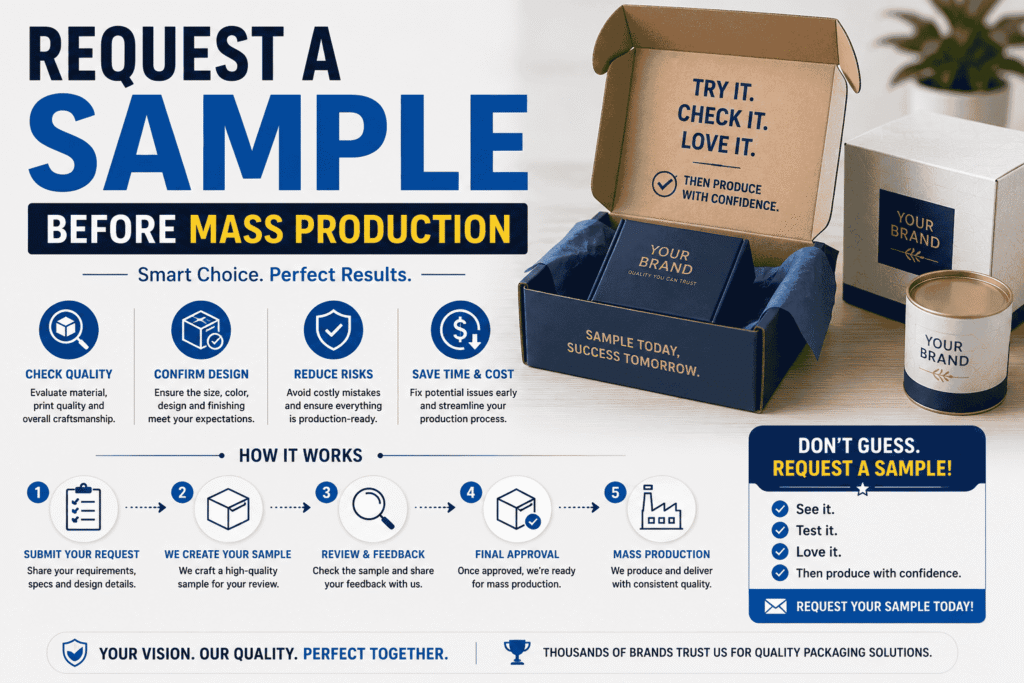
No matter how good the digital mockup looks, always request a physical sample before approving your full order.
A physical sample shows you how the colors actually print (monitor calibration is never perfect), how the box assembles, whether the size works with your product, and how the finish feels in real life. It also catches any dieline errors before they become a 1,000-unit mistake.
Most reputable packaging companies offer pre-production samples (also called proofs or press proofs) for a small fee, which is usually credited against your final order. It’s the cheapest insurance you’ll ever buy.
Step 9: Finalize Your Order and Production Timeline
Once the sample is approved, you’re into production. Here’s what to know:
Minimum Order Quantities (MOQs) vary widely by supplier and print method. Digital printing can go as low as 25–50 boxes. Offset printing typically starts at 500 and can go up to several thousand. Know your MOQ before designing around a supplier.
Lead times in the US typically run 10–15 business days for production, plus shipping. Rush orders are often available at a premium. International suppliers (particularly from China) may offer lower costs, but with 4–6 week lead times and shipping variables.
Plan around your launch date. Leave room for revisions, sample approval, and delays as they may occur. Out of the brands that have exhausted their custom packaging, most of them did so due to a lack of lead time.
Conclusion
Custom boxes are far from just being a package; they’re your brand’s first ‘handshake’ with the customer, and that’s more significant than you think. By taking the time to choose the right box, material, print method, and finish, you are creating a brand experience that has a huge impact and will be remembered and come to be part of the re-purchase cycle. It doesn’t need to be complicated, though: understand what you need, ensure that your dimensions are right, create your design for your customer, and, of course, always test your design before scaling.