
So you’ve finally decided on pillow boxes for your product, and now you’re staring at a size chart wondering which one to pick. I get it. I’ve been in packaging long enough to remember the first batch of pillow boxes I ever ordered for a client’s soap line — half the boxes were too loose, the product kept sliding to one end, and we had to eat the cost of a full reprint. That mistake taught me more about sizing than any spec sheet ever could.
Pillow boxes look simple. Curved top, curved bottom, a little tab that tucks in. But that curve is exactly what trips people up when they’re figuring out dimensions, because a pillow box doesn’t behave like a normal rectangular box where length times width times height tells you everything you need to know. This guide is basically everything I wish someone had told me before that first disastrous order.
What Is a Pillow Box, Really
If you’ve ever gotten a small gift wrapped in a box that looked like a puffed-up pillow (hence the name), you already know the style. No sharp corners, no flat lid — just a soft, rounded shape that pops open from the middle and tucks itself shut. Brands love them for soaps, jewelry, chocolates, baked goods, small retail items, event favors, that kind of thing.
Here’s the part most people don’t think about until it’s too late: because the box curves inward at the top and bottom, the space inside isn’t the same as the flat outer measurement printed on the box spec. You lose a bit of usable room to that curve. Not accounting for it is probably the single biggest reason people end up with boxes that don’t fit right.
Why Size Actually Matters Here
I’ve heard people say “it’s just packaging, we’ll figure it out later” more times than I can count. Then later comes, and the boxes are sitting in a warehouse not fitting the product.
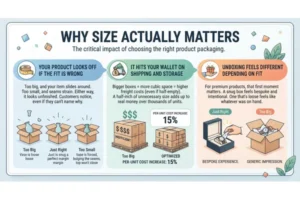
Your Product Looks Off If the Fit Is Wrong
Too big, and your item slides around and looks like it got tossed in there. Too small, and the seams strain, sometimes to the point the box won’t close at all. Either way it looks unfinished, and customers notice that kind of thing even if they can’t say exactly why.
It Hits Your Wallet on Shipping and Storage
Bigger boxes mean more cubic space, and more cubic space means higher freight costs whether the box is full or half-empty. I’ve seen brands size up “just to be safe” and then wonder why their per-unit shipping cost crept up. If you’re doing this at any real volume, a half-inch of unnecessary size on every box adds up to real money by the time you hit a few thousand units.
Unboxing Feels Different Depending on Fit
For gifting or premium products especially, that first moment of opening the box matters. A box that hugs the product snugly feels like it was made for it. One that’s loose feels like whatever was on hand.
How to Actually Pick the Right Size
Start With Real Measurements, Not Guesses
Grab a ruler or calipers and measure your actual product — length, width, depth. Don’t eyeball it, don’t round up “just in case.” If the item is irregular, measure at its widest point in each direction because that’s the point the box has to clear.
Packaging a set of items together, like a few soaps in one box? Measure the group as it will actually sit, side by side, not the sum of each individual measurement. Products almost never stack as tidily as the math suggests.
Figure Out How Snug You Want It
There isn’t one correct fit — it depends on what’s going in the box. Small, lightweight things like jewelry or chocolates usually look and sit best in a snug box that holds its curve well. Anything fragile, or anything you’re padding with tissue paper or filler, needs more room, so go a size up from what the bare product measurement tells you.
Don’t Forget the Curve and Material Thickness
This is the step everyone skips, and it’s the one that causes most of the headaches I mentioned earlier. Because of that pillow-shaped curve, usable interior space is always a little less than the outer dimensions suggest. Add a small buffer — a few millimeters per side is usually enough — to account for the fold and the thickness of the stock.
Thicker material, like heavier kraft or rigid stock, eats up more of that buffer than something thin and flexible. If you’re not sure how much to add, this is exactly what samples are for (more on that below).
Account for Anything Else Going Inside
A thank-you card, a sticker, some tissue paper — none of that is heavy, but it takes up space. Size the box around the product alone and you might find there’s no room left for the little extras once everything’s actually packed.
Get a Sample Before You Commit
I say this to every client, and I’ll say it here too: order one box, or a small test run, before you commit to the full print job. You’ll learn things from holding an actual box that no spec sheet tells you — how the product sits, whether it slides in easily, whether the curve holds its shape once there’s weight inside. It’s a small delay that saves you from a warehouse full of boxes that don’t work.
Mistakes I See Constantly
Trusting “Standard” Sizes Blindly
Standard doesn’t mean it fits your product. It means it fits a lot of products reasonably well, which isn’t the same thing.
Mixing Up Flat and Assembled Dimensions
Pillow boxes usually ship flat and get assembled on your end. Looking at the flat template numbers and assuming that’s how the popped-open box will measure is an easy way to end up surprised.
Forgetting Weight Entirely
A box can be sized perfectly and still fail if the product is heavier than the material can hold without straining the seams. Heavier items sometimes need a size adjustment along with a sturdier stock, not just a bigger box.
Skipping the Manual Test Fold
If you’re working from a template or building your own dieline, fold a paper mockup by hand before sending anything to print. Takes five minutes and it’s saved me from bad print runs more than once.
Final Thoughts
There’s no magic formula for pillow box sizing that works for every product — I wish there were, it’d make my job a lot easier. What actually works is measuring your product properly, being honest about how snug or loose you want the fit, and leaving room for that curve and fold that pillow boxes are known for. Order a sample first. Always order a sample first. It’s the cheapest insurance you’ll ever buy against a box that looks great on paper and falls apart the moment your product is actually inside it.