
There’s something oddly satisfying about a pillow box. That curved shape, the way it holds its form without a single strip of tape — it looks like it took a factory to produce, but honestly, you can make one at your kitchen table with a ruler and about twenty minutes of patience.
If you sell soap, jewelry, baked goods, small gifts, or basically anything that doesn’t need Fort Knox-level protection, a pillow box might be exactly what your packaging has been missing. Here’s how to actually make one, step by step, without the fluff.
What Even Is a Pillow Box?
Picture a box that curves outward on the top and bottom, like a little cushion, and pinches in slightly at both ends. No glue holding the main structure together, no tape — just paper or thin cardstock folded in a way that locks itself shut. It’s the packaging equivalent of origami that actually has a job to do.
They’re popular for a reason. They’re cheap to make, they look far more expensive than they cost, and they’re genuinely simple once you understand the fold pattern. The tricky part isn’t the folding itself — it’s getting your first template right. Get that wrong, and the box either won’t curve properly or won’t hold shut.
What You’ll Need Before You Start
Nothing exotic here. You need:
- Cardstock or thin cardboard (something in the 200–300 GSM range works well — too thin and it won’t hold its curve, too thick and it won’t fold cleanly)
- A ruler and pencil
- A cutting tool — scissors work, but a craft knife gives cleaner edges
- A bone folder, or honestly the back of a spoon works fine too
- Something to measure your product with, since the box needs to actually fit whatever’s going inside it
That’s it. No specialty equipment required, which is part of why pillow boxes are so popular with small businesses just starting out.
Step One: Measure Your Product First, Not the Box
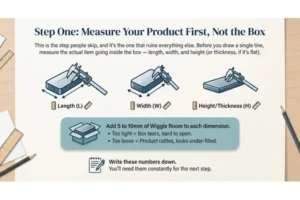
This is the step people skip, and it’s the one that ruins everything else. Before you draw a single line, measure the actual item going inside the box — length, width, and height (or thickness, if it’s flat).
Add a small amount of wiggle room, maybe 5 to 10 millimeters on each dimension, so the product isn’t jammed in there. Too tight, and you’ll tear the box getting things in and out. Too loose, and the product rattles around and the whole box looks under-filled and a bit sad.
Write these numbers down. You’ll need them constantly for the next step.
Step Two: Draw the Template
This is where most people get intimidated, but it’s really just a rectangle with some extra flaps.
Start with a flat sheet of your cardstock. Mark out a central rectangle sized to your product’s length and width — this becomes the main body of the box. On either side of that rectangle, you’ll add curved flap sections that taper inward; these are what create the “pillow” curve and the locking tabs at each end.
A rough breakdown looks like this:
- Center panel: matches your product’s length
- Side flaps: each about half the product’s width, tapering to a rounded point
- Locking tabs: small curved tabs at the very ends that slot into the body once folded
If you’re nervous about getting the curve wrong on your first attempt, search for a free pillow box template online, print it at your exact size, and use it as a guide until you’re comfortable drawing your own. There’s no shame in that — most people who make these regularly still start from a template and adjust it.
Step Three: Score Before You Fold
Don’t skip scoring. This is the difference between a crisp, professional-looking box and one that looks like it was folded by someone in a hurry.
Using your ruler and a bone folder (or that spoon), press a firm line along every fold point marked on your template. Scoring compresses the paper fibers along that line so it folds exactly where you want it to, instead of creasing wherever the cardstock feels like bending.
Do this for every fold line before you actually start folding anything. It’s tempting to fold as you go, but scoring the whole template first gives a much cleaner final shape.
Step Four: Cut and Fold
Now cut along your outer template lines, including the curved flap edges.
Fold the two long side panels up and inward first — this creates the main curved body of the box. Then fold the end flaps in, tucking the small locking tabs into the slits or pockets built into the opposite side of the fold (this is usually where a simple slit cut earlier in the template comes into play).
Go slowly here. Pillow boxes rely on tension — the curve of the cardstock pressing against the folded tabs is what keeps the whole thing shut without any adhesive. If a fold feels loose, go back and re-score that line a little more firmly.
Step Five: Insert Your Product and Check the Fit
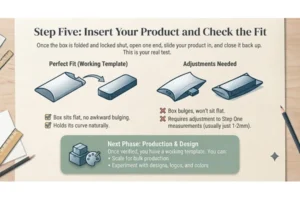
Once the box is folded and locked shut, open one end, slide your product in, and close it back up. This is your real test. If the box bulges awkwardly or won’t sit flat, your measurements from Step One probably need adjusting slightly — usually just a couple of millimeters makes the difference.
If everything fits well and the box holds its curve on its own, you’ve got your working template. From here, you can scale it up for bulk production or start experimenting with printed designs, embossed logos, or colored cardstock.
A Few Things That Trip People Up
Paper weight matters more than people expect. Standard printer paper is too flimsy — it won’t hold the curve and will look crumpled within a day. Stick to proper cardstock.
Humidity affects the fold. If you’re making these somewhere humid, the paper can soften slightly and lose its crisp curve faster. Store finished boxes somewhere dry.
Don’t over-tighten the locking tabs. If the tabs are cut too large or forced in too hard, they can tear the slit they’re meant to slide into, which weakens the whole closure.
Bottom Line
Pillow boxes look far more complicated than they are. Once you’ve measured your product properly and gotten one template right, the rest is just repetition — score, fold, lock, done. And for a box that costs next to nothing to make, it’s hard to beat how expensive the final result actually looks sitting in someone’s hands.