Ten years ago, seeing your packaging in 3D meant paying a designer, waiting on a physical sample, or squinting at a flat PDF and hoping the folds landed where you expected. That’s changed. Online 3D packaging design tools now let anyone — a first-time Shopify seller or an in-house design team — build a dieline, drop in graphics, and spin the box around on screen before a single sheet of material gets cut.
This guide breaks down how these tools actually work, what separates a good one from a gimmick, and what to check before you commit your brand’s packaging workflow to one.
What Is a 3D Packaging Design Tool?
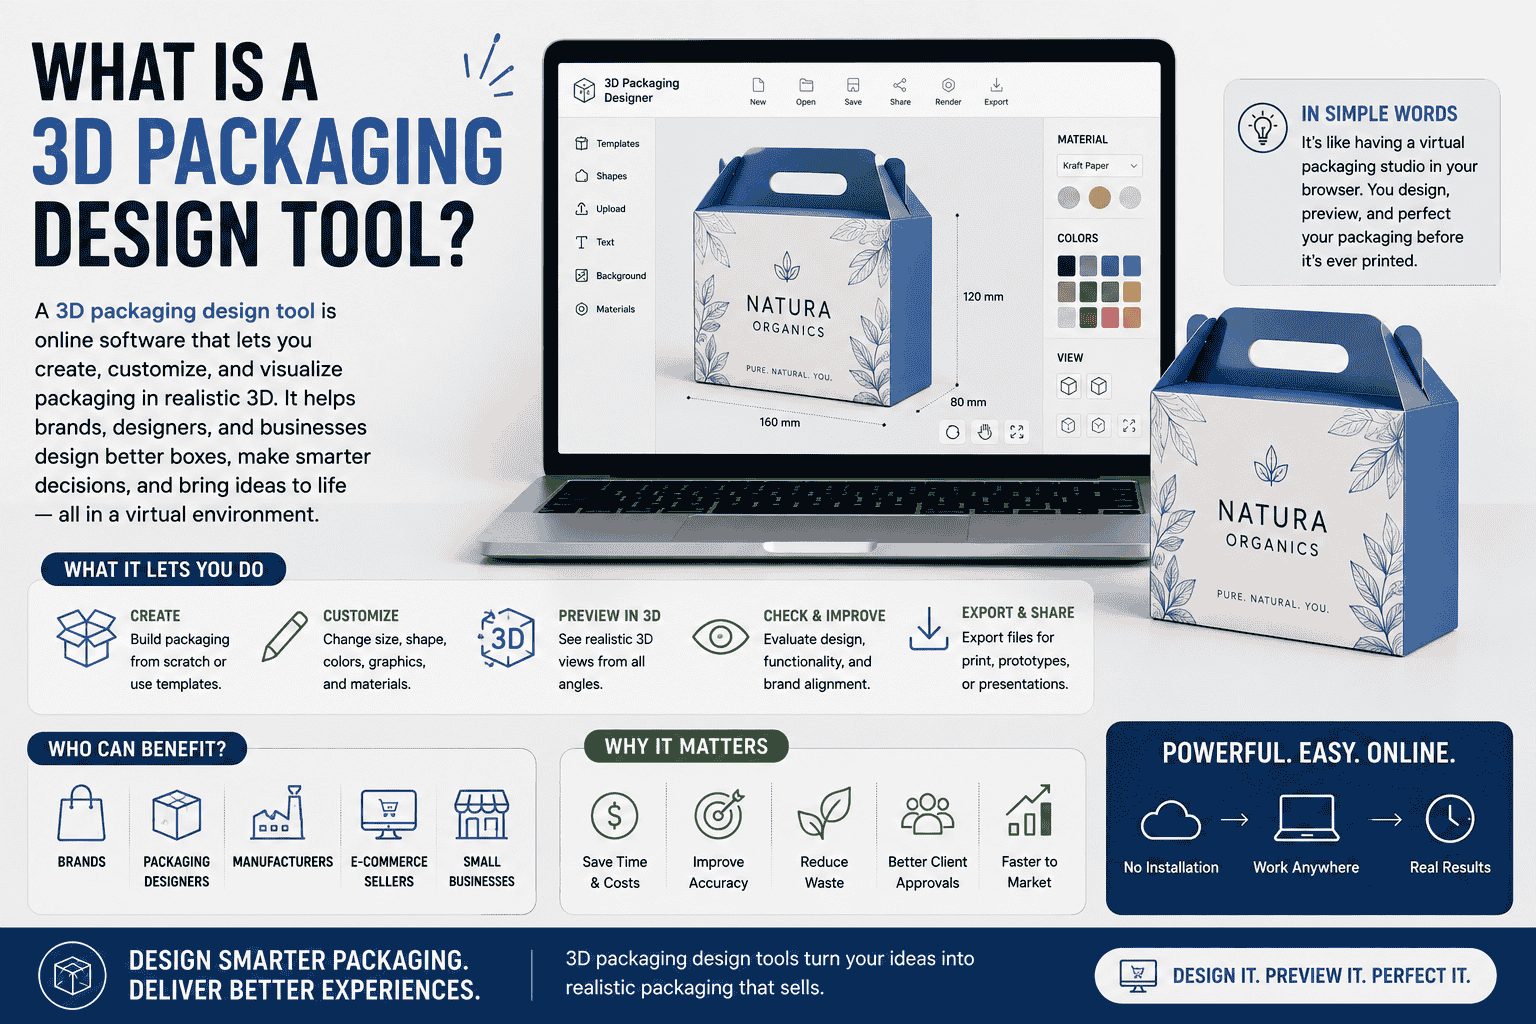
At its core, a 3D packaging design tool converts a flat packaging structure — the dieline — into an interactive 3D model you can view, rotate, and edit in a browser. Most platforms combine three things in one interface:
- A dieline library, so you’re not drawing fold lines and cut lines from scratch
- A 3D rendering engine, which wraps your artwork onto the model and simulates material, lighting, and texture
- Basic editing tools, letting you swap dimensions, materials, or graphics and see the result update in real time
Some tools also let you upload an existing dieline (PDF, AI, or SVG) and convert it into a 3D model, which is useful if your production files already exist and you just need a visual.
How the Process Works, Step by Step
- Pick a structure. You choose a packaging type — mailer box, tuck-end box, pouch, bottle, tube — from a template library, or upload your own dieline.
- Set the dimensions. Enter length, width, and height, and the dieline recalculates automatically.
- Choose a material. Kraft, coated paperboard, corrugated, rigid board, or plastic — the material choice affects how the render looks (texture, sheen, flexibility) later.
- Apply your artwork. Upload your print-ready graphics or design directly on the flattened dieline.
- Render in 3D. The tool wraps the artwork onto the folded model and applies lighting, shadow, and background so it looks like a photograph.
- Export. Most platforms let you download the 3D mockup as an image or video, and the dieline as a production-ready file.
Why Brands Are Adopting These Tools
Physical prototypes are slow and expensive. A single cardboard or kraft sample can take days to produce and ship, and revisions multiply that cost. A 3D render gives you a decision-ready visual in minutes.
They reduce approval cycles. When a client or internal stakeholder can see a realistic mockup — not a flat proof — feedback rounds tend to move faster, because there’s less left to the imagination.
They lower the skill barrier. You don’t need to know how to draft a dieline by hand or run 3D modeling software like KeyShot or 3ds Max. Template-based tools handle the technical structure so the designer can focus on the artwork.
They catch problems earlier. Seeing how a design wraps around corners, folds, or curved surfaces before printing helps flag issues — misaligned logos, awkward seams, colors that read differently on kraft versus white board — while they’re still cheap to fix.
What to Look for When Choosing One
Not all 3D packaging tools are built the same. A few things worth checking before you rely on one for production decisions:
- Dieline accuracy. Templates should follow real industry-standard measurements, not approximate shapes. If you’re going to print from the exported dieline, accuracy isn’t optional.
- Material realism. A tool that renders every material with the same glossy finish isn’t giving you a true preview of how kraft, matte board, or rigid box material will actually look.
- Export formats. Confirm the tool exports files your printer can actually use — typically PDF or AI for dielines, and PNG or MP4 for mockups.
- Template range. Check whether the library covers the packaging types you actually need (mailer boxes, pouches, cosmetic boxes, bottles) rather than just a handful of generic shapes.
- Editing flexibility. Can you adjust dimensions and re-render without starting over, or are you locked into fixed template sizes?
- Learning curve. Some tools genuinely require no design background; others still assume familiarity with layers and vector artwork. Try a template before you build a workflow around it.
- Cost structure. Some platforms are free with limited exports, others are subscription-based. Weigh that against how often your team will actually use it.
Common Use Cases
- E-commerce brands validating box design before ordering a print run
- Packaging agencies and manufacturers presenting concepts to clients without producing physical samples for every round
- In-house design teams iterating on packaging quickly during product development
- Startups without a dedicated packaging designer, using templates to get a professional-looking result
The Current Landscape
A handful of platforms dominate this space right now, each with a slightly different focus — some lean toward ready-made template libraries for speed, others toward precision dieline generation for teams that need production-accurate files, and some position themselves as an all-in-one replacement for traditional prototyping. The right one depends less on which is “best” overall and more on what your team actually needs: fast mockups for client pitches, or production-ready files you can hand straight to a printer.
Final Thought
3D packaging design tools won’t replace a physical sample entirely — there’s still no substitute for holding the real material in your hands before a big print run. But for the early stages of packaging development — deciding on structure, testing artwork, getting stakeholder sign-off — they’ve cut what used to take days down to minutes, and made the process accessible to teams without a dedicated packaging designer on staff.