
If you’ve priced out rigid boxes and felt sticker shock compared to a standard folding carton, you’re not imagining things. Rigid boxes typically run $4 to $9 per unit for standard styles, and $12 to $25+ for luxury configurations with magnetic closures, ribbon pulls, or two-piece construction — versus $0.40–$2 for a comparable folding carton. That’s not a random markup. It comes down to how the box is actually made.
Rigid boxes are built from thick, non-collapsible paperboard (usually 1,200–3,000 GSM chipboard or greyboard) that’s wrapped in a decorative paper or fabric, rather than printed directly and scored to fold flat. That construction method touches almost every line item in a manufacturing quote. Below is a breakdown of what you’re actually paying for, so you can see where your budget is going — and where there’s room to negotiate.
1. Raw Material Grade and Thickness
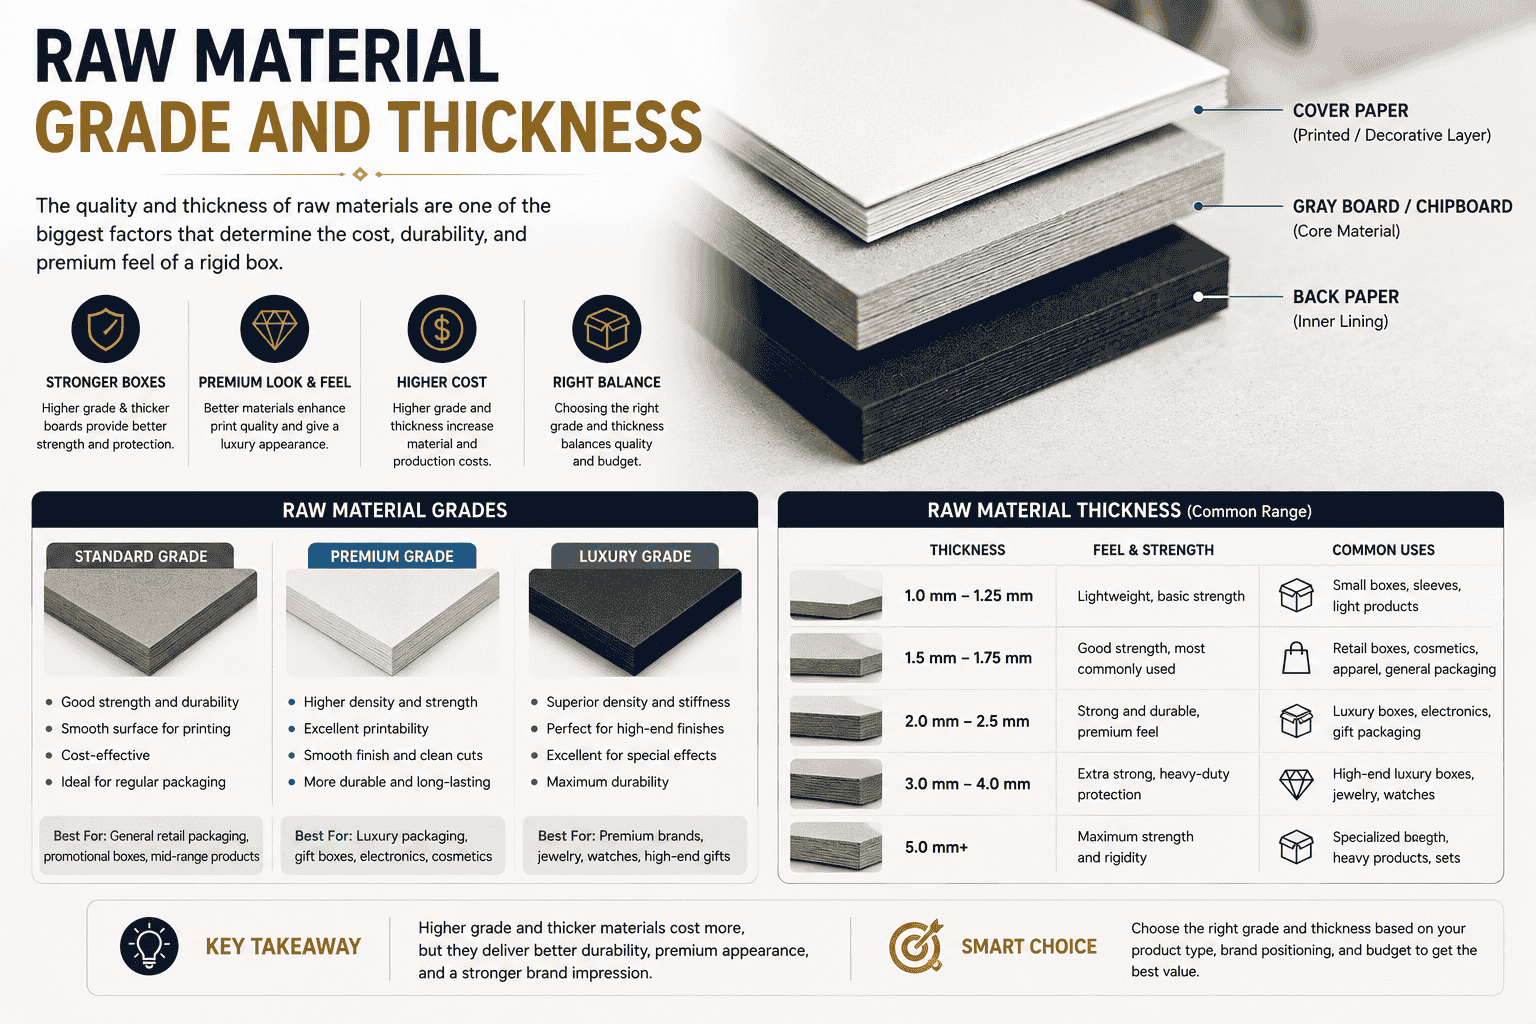
Material is usually the single largest cost driver, typically 45–60% of total unit cost. For rigid boxes specifically, you’re paying for two materials, not one:
- The rigid core (chipboard/greyboard): Thicker board (2mm–3mm+) costs more but holds its shape better and feels more premium in-hand. Thinner board cuts cost but risks warping on larger boxes.
- The wrap material: Options range from basic printed paper wraps to textured art paper, linen, leatherette, or specialty stocks. A jump from a standard matte wrap to a textured or foil-accented wrap can add $0.50–$2.00 per unit on its own.
Where you can save: Dropping board thickness by even 0.5mm on a box that doesn’t need to support heavy weight is often the least noticeable cut you can make.
2. Box Style and Construction Complexity
Not all rigid boxes are built the same way, and construction method changes labor time directly:
| Style | Relative Cost | Why |
| One-piece (base + lid combined) | Lowest | Fewer components, less assembly |
| Two-piece (separate base and lid) | Moderate | Two components must be wrapped and aligned separately |
| Book-style / magnetic closure | Higher | Hinge mechanism, magnet insertion, precise alignment |
| Drawer/slide-out style | Highest | Tightest tolerances, most hand-finishing |
Because rigid boxes can’t be die-cut and folded by machine the way corrugated or carton stock can, most of this construction still involves manual or semi-manual wrapping, which brings labor into the equation more heavily than with other packaging types.
3. Labor and Assembly
This is the factor people most consistently underestimate. Rigid boxes are largely hand-assembled: the board is cut, corners are wrapped, edges are folded and glued, and inserts are fitted — often by a person, not a machine. That’s why rigid box pricing doesn’t drop as sharply at scale as it does for offset-printed cartons. Setup costs shrink with volume, but per-unit labor stays relatively flat, because each box still takes roughly the same number of hands-on steps whether you order 500 or 5,000.
4. Printing Method and Finishing
Rigid boxes are typically wrapped in pre-printed paper rather than printed directly, which changes the cost math compared to offset or digital printing on carton stock:
- Number of ink colors / full-color printing adds plate and setup costs (more relevant for offset runs on the wrap paper itself).
- Finishes like matte lamination, gloss lamination, spot UV, foil stamping, or embossing/debossing are applied after the box is assembled and can each add anywhere from $0.20 to $1.50+ per unit depending on coverage area.
- Multiple finishes stacked together (e.g., foil logo + soft-touch lamination) compound rather than average.
Practical tip: Foil stamping and embossing on a small logo area reads as “premium” without the cost of finishing the entire surface.
5. Order Volume
Economies of scale apply, but less dramatically than with corrugated or folding cartons, for the labor reasons above. Setup costs (plates, dies, initial calibration) get spread across more units as volume increases, which is where most of the per-unit savings actually comes from — not from the board or wrap getting cheaper in bulk. If your quote shows a sharp cost drop above a certain quantity, it’s almost always because you crossed a setup/tooling threshold, not because materials got a bulk discount.
6. Size, Weight, and Dimensional Shipping Costs
Bigger boxes use more board and wrap material, obviously — but the bigger hidden cost is shipping. Because rigid boxes ship pre-assembled (they can’t be flattened and folded on-site like collapsible packaging), they take up significantly more container and truck space per unit. Carriers often charge by dimensional weight rather than actual weight, so an oversized-but-light rigid box can cost as much to ship as a much heavier item. This is a large part of why collapsible/foldable rigid boxes exist as a category — they retain the rigid-box look while shipping flat, cutting freight costs meaningfully on large orders.
7. Tooling and Custom Dies
If your box uses a non-standard shape, custom insert, or unique window cutout, you’ll likely pay a one-time tooling or die charge. This is a fixed cost, so it has an outsized effect on small orders and becomes nearly negligible on large ones — worth keeping in mind if you’re testing a design before committing to volume.
8. Inserts and Internal Packaging
Foam inserts, cardboard dividers, tissue paper, ribbon ties, or custom-molded pulp trays are often quoted separately from the box itself, but they can add $0.50–$3.00+ per unit depending on complexity. If your product needs product-specific protection (jewelry, electronics, glassware), factor this in early rather than as an afterthought — retrofitting inserts into an already-finalized box design usually costs more than designing them together.
What a Realistic Cost Breakdown Looks Like
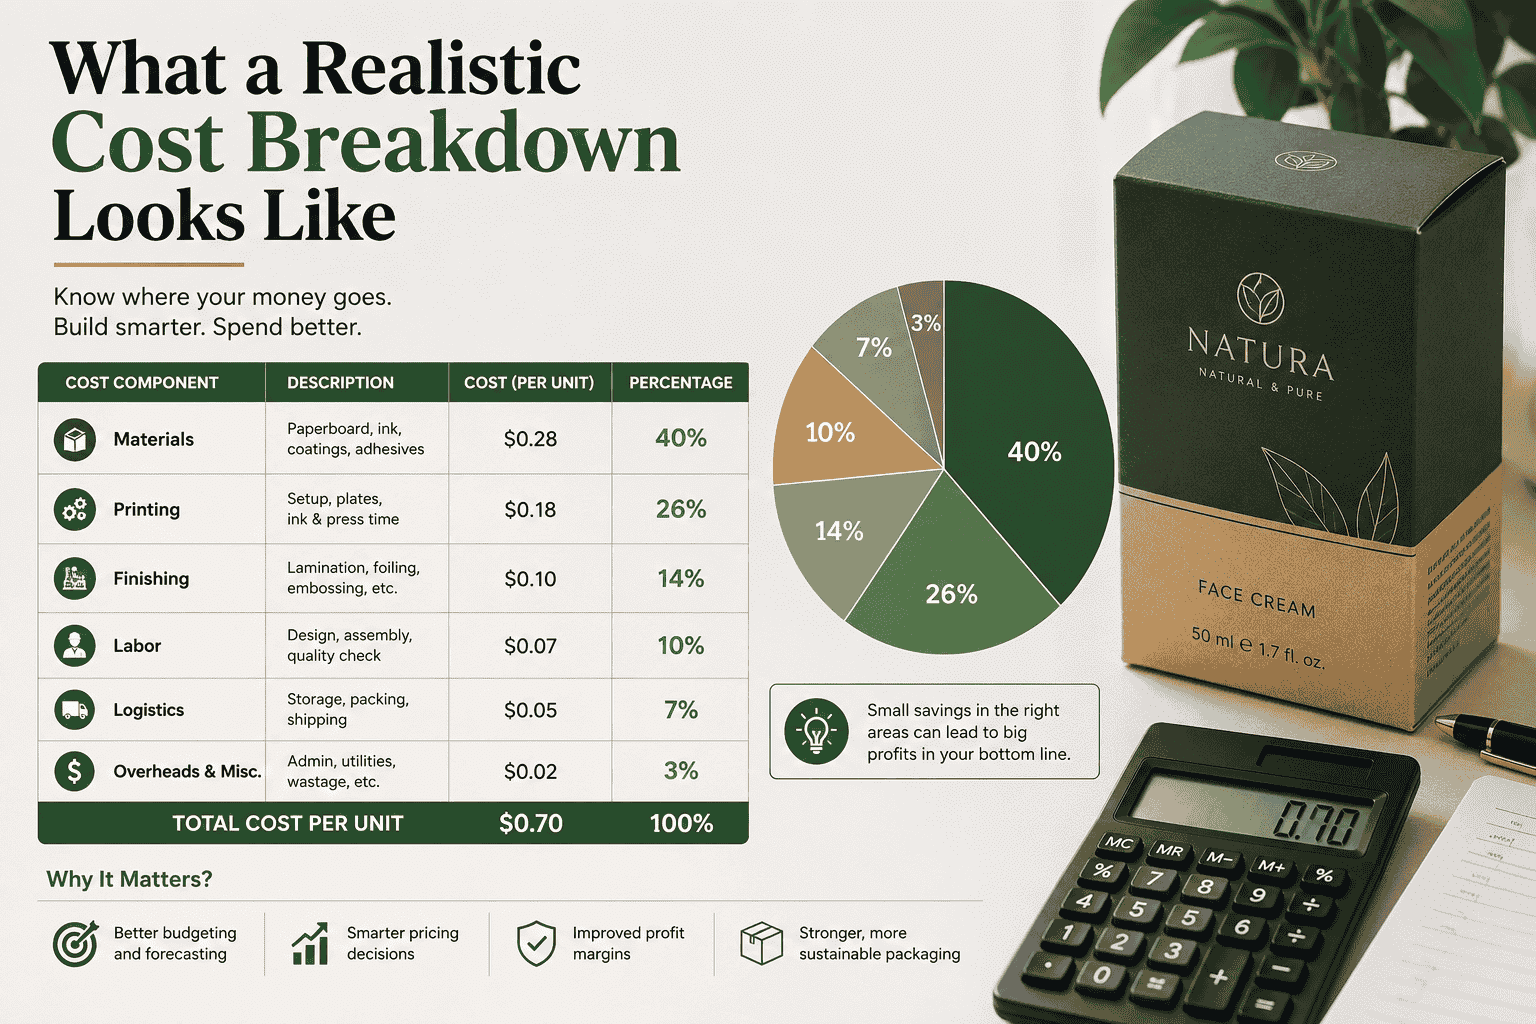
For a mid-size custom rigid box (roughly 8″ x 6″ x 3″, two-piece, one foil-stamped logo, matte lamination, ordered in a run of 1,000):
- Board and wrap material: ~40–50%
- Labor/assembly: ~25–30%
- Printing and finishing: ~10–15%
- Tooling (amortized): ~5–10%
- Shipping/freight: ~5–10%
These percentages shift depending on order size — smaller runs skew more heavily toward tooling and setup, larger runs skew more toward material and freight.
How to Bring the Cost Down Without Cutting Quality
- Standardize your box dimensions where possible — custom sizing often means custom tooling.
- Concentrate finishing on a focal point (logo, front panel) instead of full-surface treatment.
- Consider collapsible/foldable rigid construction if freight is a large share of your cost.
- Order in tooling-threshold batches rather than exactly what you need this month, if storage allows.
- Get itemized quotes, not just a per-unit number — it’s the only way to see which line item is actually driving your cost up.