If you have ever ordered custom packaging and felt confused the moment the supplier sent over a flat, line-covered template — you are not alone. That flat template is called a dieline, and understanding it is the difference between packaging that arrives perfectly and packaging that gets reprinted at your expense.
This guide explains exactly what a dieline is, how every line on it works, how to read one correctly, and the mistakes that cause the most expensive problems in custom packaging production. Whether you are a brand owner, graphic designer, or product manager ordering boxes for the first time, this is what you need to know.
What Is a Dieline in Packaging?
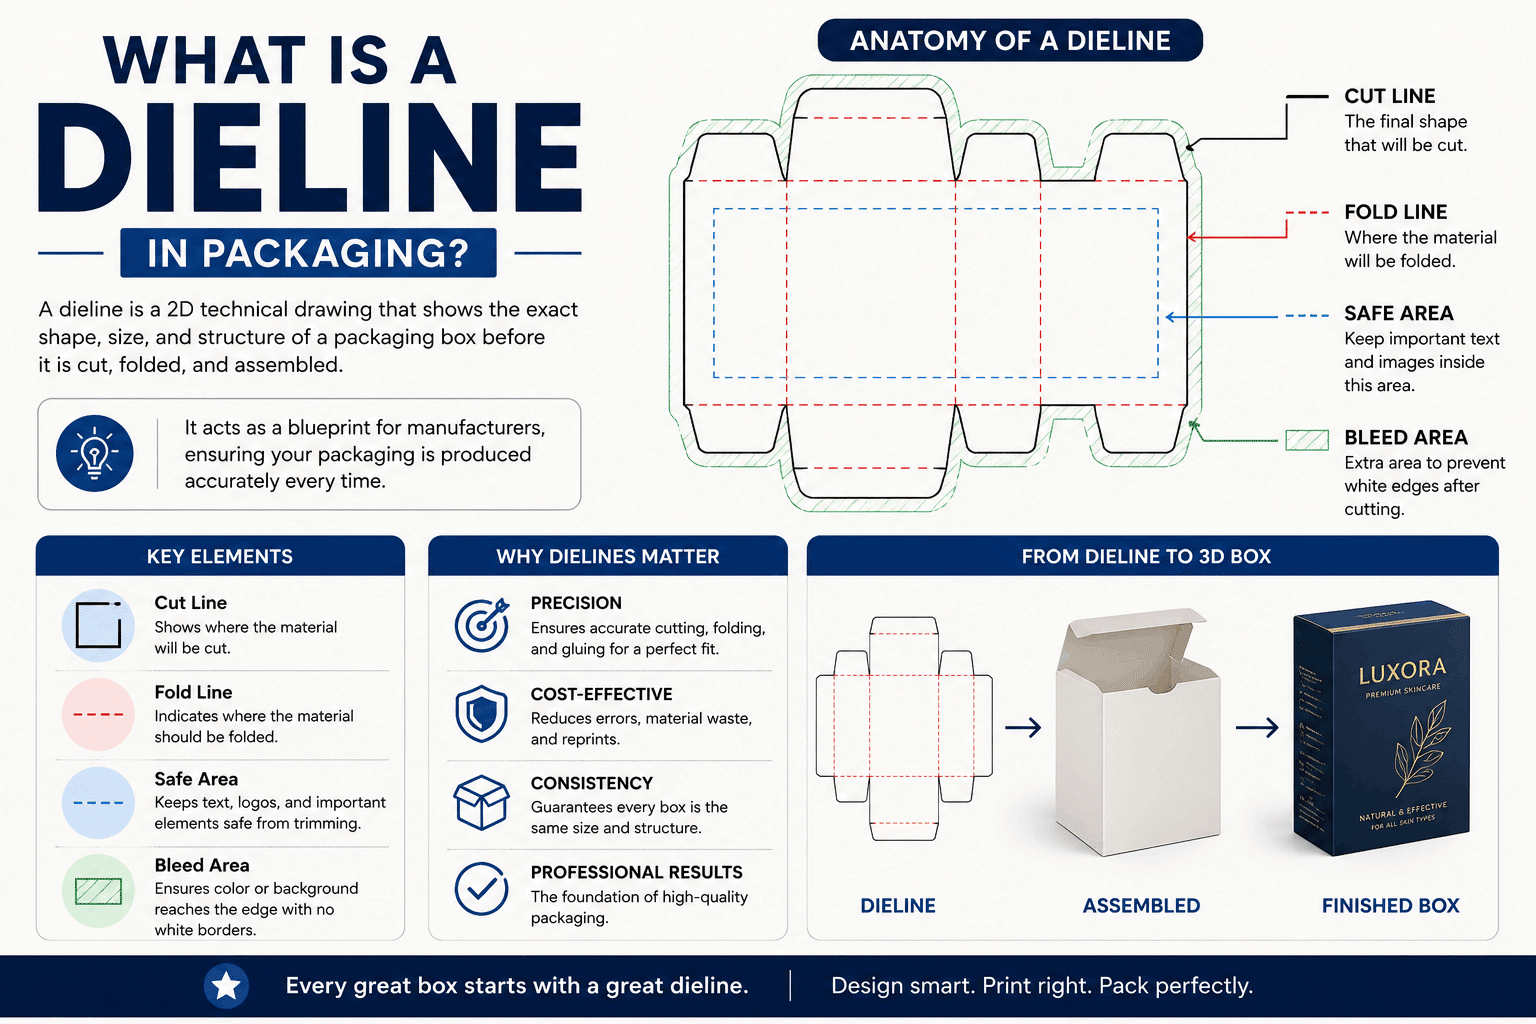
A dieline is a flat, two-dimensional technical template that shows the complete layout of a package before it is cut, folded, and assembled into its final three-dimensional shape.
Think of it this way: take any cardboard box, unfold it completely until it lies flat on a table. That flat shape, with all its flaps, panels, and tabs spread out, is essentially what a dieline represents. The dieline adds a layer of precision on top — marking exactly where the machine cuts the material, where it scores and folds, where glue is applied, and where the artwork must stay within safe boundaries.
A dieline is used by three groups of people at the same time:
- Designers use it to place artwork, logos, and text correctly across every panel of the package
- Printers use it to check alignment, spacing, and color placement before plates are made
- Manufacturers use it to program die-cutting machines to cut and score the material at the right places
Without a dieline, there is no reliable way to ensure that a design created on a screen will translate into a physical box that looks right, assembles correctly, and holds its shape under real-world conditions.
Where Does the Word “Dieline” Come From?
The name combines two words: “die” and “line.” In manufacturing, a die is a custom-shaped cutting tool — a steel blade bent into the exact outline of the package shape, mounted on a board, and pressed into the material to cut it out. The lines on the template show where this die will cut. Hence: die + line = dieline.
Modern production uses CNC machinery and digital cutting files rather than physical steel dies for many applications, but the name has stuck.
The 4 Types of Lines on a Dieline — and What Each One Means
This is where most people get confused. A dieline is not just one type of line — it is a combination of several, each with a specific meaning and usually a specific color. Here is what each one does:
1. Cut Lines (Trim Lines)
Typically shown in: solid black or dark blue
Cut lines mark the outer boundary of the package — where the machine physically cuts through the material to separate the flat package shape from the sheet. Everything outside the cut line is waste material that gets discarded. The cut line defines the overall shape and silhouette of the unfolded box.
2. Fold Lines (Score Lines)
Typically shown in: solid red or dashed lines
Fold lines mark where the material will be scored — pressed down with a blunt tool to weaken the fiber so it folds cleanly and crisply along a straight line. Without scoring, cardboard and paperboard do not fold predictably. They crack, buckle, or fold at a slight angle, which throws off the entire structure of the assembled box.
Every panel joint, flap, and tab in your package is defined by a fold line. When you fold a dieline into its 3D shape, the fold lines become the edges and corners of the box.
3. Bleed Lines
Typically shown in: solid green or pink
The bleed line sits outside the cut line, typically 3 mm (0.125 inches) beyond it. Any background color or full-bleed artwork in your design must extend all the way to the bleed line — not just to the cut line.
Here is why: cutting machines are precise, but not pixel-perfect. There is a small tolerance — sometimes less than a millimeter — in where the cut actually lands. If your background color stops exactly at the cut line, a slight variation in the cut position will leave a thin strip of unprinted white paper visible at the edge of the finished box. This looks unprofessional and is impossible to fix after printing.
Extending artwork to the bleed line gives the cut a safe zone. Even if it lands slightly inside or outside the intended position, the color will still reach the edge of the final box.
4. Safety Lines (Safe Zone)
Typically shown in: dashed green or dotted lines
The safety line sits inside the cut line — typically 3–5 mm inward. Any text, logos, barcodes, or other important design elements that must not be cut off should stay inside this line. Think of it as the inner boundary that guarantees your critical content stays visible on the finished box regardless of minor variations in the cut.
A common mistake: placing product names or ingredient text near the edge of a panel, outside the safety zone. Even a 1–2 mm shift in the cut can clip letters or make text illegible. Keep anything that matters inside the safety line.
What a Dieline Looks Like: A Visual Breakdown
Imagine unfolding a standard rectangular box. Laid flat, a dieline for that box would show:
- A large rectangular center panel (the main face of the box)
- Panels attached to each side (left, right, top, bottom faces)
- Flaps extending from the top and bottom panels (used to close the box)
- Glue tabs on one side panel (used to join the box into its tube shape)
- All four types of lines overlaid across the flat shape
When a designer places artwork on this template, they are essentially painting across this flat shape in a way that will look correct once it is folded into a box. The front panel gets the main design. Side panels get secondary information. The inside of the lid flap might get a small brand message. The bottom panel gets regulatory information.
Dieline vs. Mockup: What Is the Difference?
These two terms are often confused, but they serve very different purposes.
| Dieline | Mockup | |
| Format | 2D flat template | 3D visual representation |
| Purpose | Production and printing guide | Visual approval and presentation |
| Who uses it | Designers, printers, manufacturers | Brand managers, clients, marketing teams |
| File type | Vector (.ai, .pdf, .eps) | Image (.jpg, .png) or 3D render |
| Accuracy | Exact — production-ready | Approximate — for visual reference |
A mockup shows you what the finished box will look like. A dieline tells the machine how to make it. You need both — the mockup for approval, the dieline for production.
Dieline vs. Template: Is There a Difference?
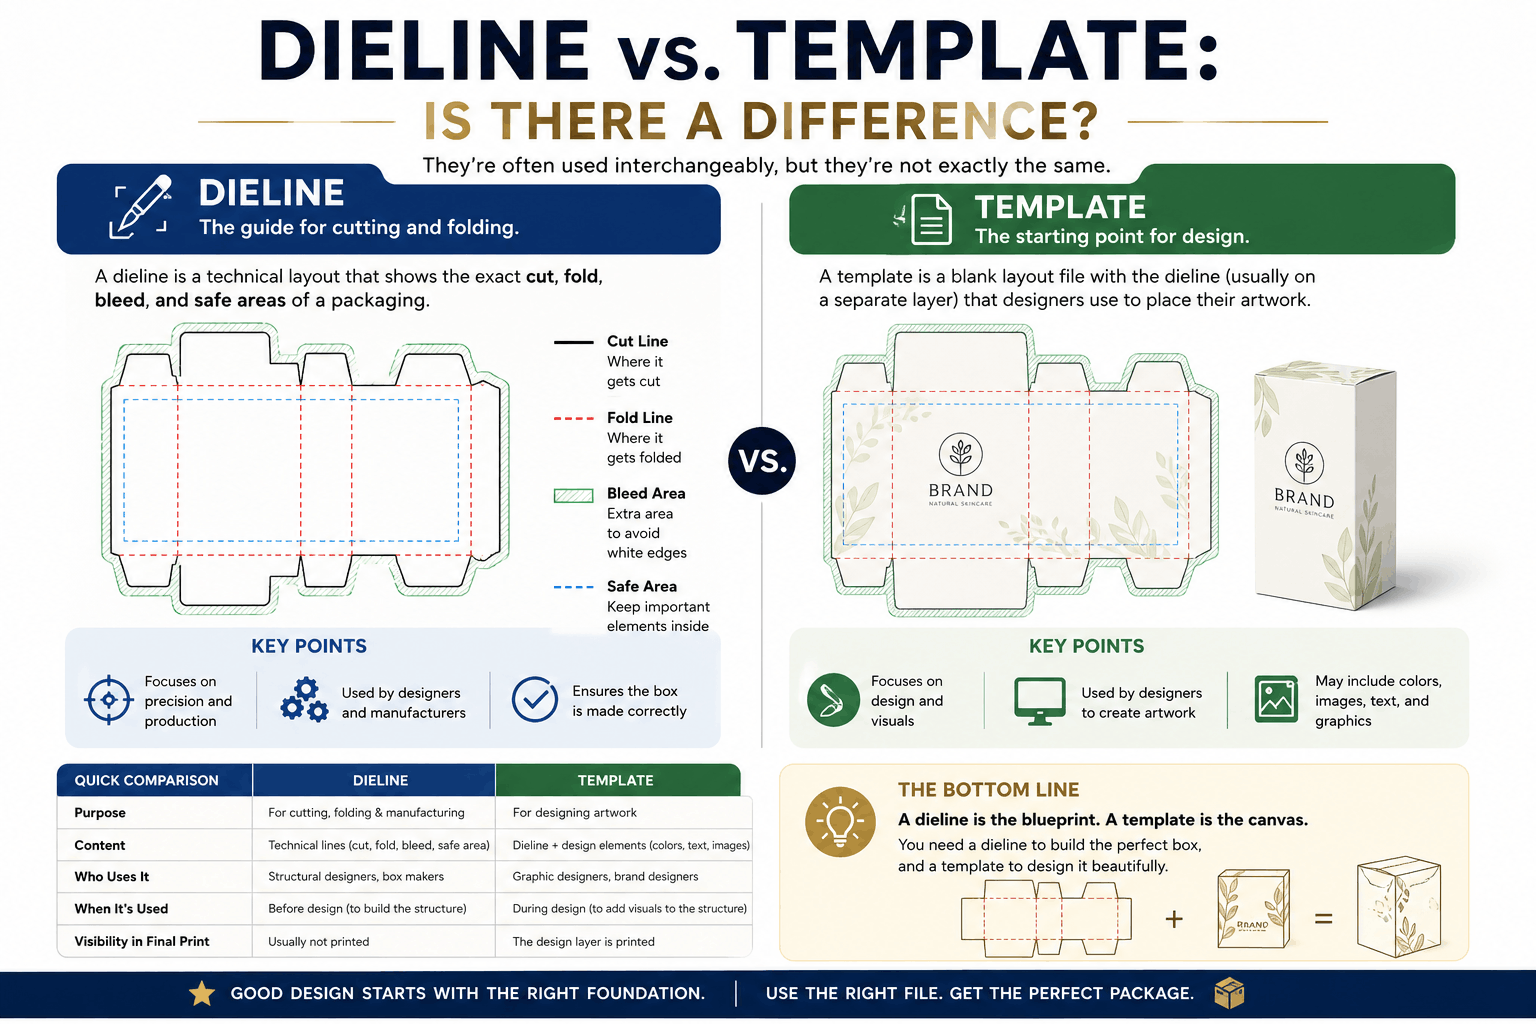
The terms are often used interchangeably, but there is a subtle distinction. A template is a starting point — a pre-built dieline structure for a standard box size or style that can be adapted. A dieline is the final, production-ready version of that template, customized to the exact dimensions and specifications of a specific package.
When a packaging supplier says “we will send you a template,” they mean they will send you a dieline for the box size you have chosen. You then add your artwork on top of it.
Common Dieline Mistakes (and How to Avoid Them)
These are the errors that cause the most reprints, delays, and budget overruns in custom packaging production:
Artwork Not Extended to the Bleed Line
The single most common mistake. If your background color or edge artwork stops at the cut line, you will see white paper edges on the finished box. Always extend background elements 3 mm past the cut line.
Important Content Outside the Safety Zone
Text, logos, barcodes, and other critical elements placed too close to the cut line risk being trimmed. Keep all important elements at least 3–5 mm inside the cut line (within the safety zone).
Using Raster Files Instead of Vector
Dielines should be vector files (.ai, .eps, .pdf). Raster images (jpegs, pngs) cannot scale without quality loss and cannot be used as a production template. Your artwork placed on the dieline can include raster elements, but the dieline itself must remain vector-based.
Designing in RGB Instead of CMYK
Screen colors (RGB) look very different when printed (CMYK). A vivid orange on your monitor can become muddy brown in print. Always work in CMYK mode when designing packaging artwork, and check with your supplier about any specific color profiles they require.
Ignoring the Glue Tab
The glue tab is one panel that overlaps another and is bonded during assembly. Artwork placed over the glue tab may be hidden or partially covered. Even worse, artwork that bleeds into the glue area can affect adhesion, causing the box to delaminate. Keep the glue tab clear of important design elements.
Wrong File Format Sent to Printer
Sending a low-resolution jpeg of your dieline design is one of the most common causes of print production delays. Always send a print-ready PDF with bleed included, or the original vector file with all fonts outlined and images embedded.
Not Requesting a Physical Sample First
Even a perfect dieline can have surprises when converted to a physical box — panels that are slightly too small, flaps that do not close flush, glue tabs that do not align. Always request a physical prototype (also called a pre-production sample or PPS) before approving a full production run.
Types of Packaging That Use Dielines
Dielines are used across virtually every category of rigid and folding packaging:
Folding cartons — the most common application. Cereal boxes, medicine boxes, cosmetic packaging, food cartons. All begin as flat dielines.
Corrugated boxes — shipping boxes, mailer boxes, product display boxes. Corrugated dielines are typically heavier and include additional structural elements like dust flaps and locking tabs.
Rigid boxes — premium packaging for electronics, luxury goods, and gift sets. Rigid box dielines are more complex because the box does not fold flat — the base and lid are separate structures.
Envelopes and pouches — flexible packaging like stand-up pouches, poly mailers, and paper envelopes all use dielines to define their shape and seal areas.
Retail display packaging — counter displays, shelf-ready packaging, and point-of-sale displays use multi-panel dielines that are among the most complex in the industry.
What Software Is Used to Create Dielines?
Dielines are created in vector-based software. The industry standard options are:
ArtiosCAD — the professional structural packaging software used by most large packaging manufacturers. Purpose-built for dieline creation with built-in libraries of standard box styles.
Adobe Illustrator — widely used by graphic designers to adapt and work with dielines. Not ideal for creating structural dielines from scratch (it lacks packaging-specific tools), but excellent for placing and refining artwork on an existing dieline template.
CAPE Suite / Kongsberg — used in large corrugated packaging operations, especially for high-volume production.
Esko Studio — allows designers to fold a dieline into a 3D preview directly inside Illustrator, which is extremely useful for checking how artwork looks on the assembled box before sending to production.
For most brand owners and designers, the workflow is: the packaging supplier creates the structural dieline in ArtiosCAD, exports it as an Illustrator-compatible PDF or .ai file, and the designer adds artwork on top in Illustrator.
Dieline File Formats: What You Need to Know
When working with dielines, you will encounter several file formats. Here is what each one means for you:
| Format | What It Is | When You Use It |
| .AI | Adobe Illustrator native file | Best for adding and editing artwork |
| Portable Document Format (vector) | Standard for sending to print; universally compatible | |
| .EPS | Encapsulated PostScript | Older vector format; still used by some suppliers |
| .DXF / .DWG | CAD formats | Used in structural packaging software; rarely needed by designers |
| .SVG | Scalable Vector Graphics | Web-friendly vector; less common in print production |
Always ask your supplier which format they prefer to receive the finished artwork. Most will ask for a print-ready PDF with 3 mm bleed, CMYK color mode, and all fonts outlined.
How Dielines Are Used in the Production Process
Understanding where the dieline sits in the overall production workflow helps you know what to review and when:
- Structural design — the supplier or packaging engineer creates the dieline based on your box dimensions and style requirements. This defines the shape, panel layout, fold positions, and glue areas.
- Artwork placement — you or your designer receive the dieline as a template and add your brand artwork, following the bleed, cut, and safety zones.
- Pre-press review — the supplier’s pre-press team checks your artwork file for technical issues: bleed coverage, color mode, resolution, font outlines, and file format.
- Proof approval — a digital proof (and ideally a physical sample) is created for your approval before production begins.
- Die-cutting — the approved dieline is used to program the die-cutting machine. The machine cuts and scores the flat sheet material into the exact shape defined by the dieline.
- Printing — the flat sheet is printed before or after die-cutting, depending on the production method and packaging type.
- Folding and gluing — the die-cut flat shapes are folded and glued (by machine or by hand) into their final 3D form.
Final Thoughts
A dieline is not a complicated concept — it is simply a flat map of a box, marked with the lines that tell machines how to cut and fold it and tell designers where to place their artwork. But getting it right is the foundation of every piece of custom packaging that looks professional, assembles cleanly, and reaches the customer in perfect condition.
The brands that avoid expensive reprints and production delays are the ones that take time to understand the dieline, review it carefully before sending artwork, always request a physical sample before a full run, and communicate clearly with their packaging supplier at every step.
If you are about to start a custom packaging project and have received a dieline from your supplier, run through the checklist in this article before placing artwork on it. The few minutes you spend getting it right at this stage will save you far more time — and money — later.
Need custom packaging with a professionally prepared dieline? [Link to your custom packaging services page here.]